- Hot Tubs & Spas
- General Information
- Chemical Dosage Charts for Hot Tubs
- Hot Tub FAQ
- How Hot Should my Hot Tub/Spa Be?
- Ultraviolet Disinfection (UV-C) for Hot Tubs
- Bulk Tubing and Hose
- Total Cost of Ownership (TCO) - Water Pump
- How-to Articles
- How to Get Rid of Algae in a Hot Tub
- How to Restart Your Hot Tub If You Haven’t Used it in a Year
- How to Test Your Hot Tub Water
- How to Properly Add Chemicals to Your Hot Tub
- PVC Installation Tips: How to Glue PVC Pipe
- Thread Sealants - Teflon Tape or Paste?
- Irrigation
- General Information
- Understanding Drought Levels and Water Restrictions
- Vancouver Island Water Restrictions
- Vancouver Island Current Water Restriction Stages
- Filter Screen Mesh to Micron Conversion Chart
- Comox Valley Smart Control Irrigation Rebate
- Victoria Water History
- Friction Loss and Water Velocity Chart
- Bulk Tubing and Hose
- 2018 Weathermatic Catalogue
- How-to Articles
- Do-It-Yourself Irrigation Design and Installation Guide
- Introduction to Micro-Irrigation
- Rain Barrel Soaker Hose
- Tips and Caring for Your Soaker hose
- PVC Installation Tips: How to Glue PVC Pipe
- Thread Sealants - Teflon Tape or Paste?
- Product Info
- Weathermatic
- Weathermatic SL800 Bundle with Rain/Freeze Sensor
- Weathermatic T3 Turbo Rotor
- Weathermatic N-100 Nitro Valve
- Mr. Soaker Hose Basics
- Mr. Soaker Hose - Frequently Asked Questions
- Drip In Soaker Dripline for Irrigation
- Lake & Lagoon Management
- General Information
- Benefits of Pond and Lake Aeration (video)
- Previous Next List Information Item Actions NAME Kasco Fountains VX Series Overview (video)
- Pump Maintenance
- Total Cost of Ownership (TCO) - Water Pump
- Bulk Tubing and Hose
- How-to Articles
- Kasco Floating Fountain Installations
- Preventing Ice Damage - Kasco Marine De-icing Guide
- PVC Installation Tips: How to Glue PVC Pipe
- Thread Sealants - Teflon Tape or Paste?
- Product Info
- KASCO Marine
- Kasco LED Fountain Lights
- Kasco Marine 3400VFX Aerating Fountain Assembly (video)
- Kasco Aerating Fountains (video)
- Microbe-Lift PBL Professional Blend Bacteria
- Kasco De-Icers
- Kasco Robust-Aire Diffuser Overview (video)
- NEW Water Pump from Shinmaywa
- Landscape Lighting
- General Information
- Benefits of Landscape Lighting (pt.1) (video)
- Premium Outdoor Lighting vs Cheaper Brands
- Light Recycling Program Information
- How-to Articles
- Construct a Low Voltage Transformer Stand (video)
- Security Lighting at it's Best - Cast LED Perimeter Light (video)
- Outdoor Lighting Wiring Techniques - Crimp and Heat Shrink (video)
- Product Info
- DH Lights: Low Voltage Outdoor Lighting, Quality & Value
- Brilliance Flex Strip Lighting
- CAST Lighting FAQ
- Solid Bronze Bullet Light from Cast Lighting - (video)
- The CAST Niche Light (video)
- Tree Light from Cast Lighting (video)
- Warming Trends
- Ponds & Watergardens
- General Information
- Everything Needed To Build a Koi Pond
- Everything Needed To Build a Pond Free Water Feature
- Benefits of having a Pond
- Do I Really Need a Pond Filter?
- Aeration - The Benefits of Bubbles
- Benefits of Pond and Lake Aeration (video)
- Waterfall Flow Chart
- It Seemed Like a Good Idea at the Time
- PondGard (EPDM) Decorative Applications Guide
- Pond Winterizing Tips and Tricks
- The Oasis Pump Vault - Under the Hood
- 2018 Atlantic Water Garden Catalogue
- Total Cost of Ownership (TCO) - Water Pump
- Bulk Tubing and Hose
- Pump Maintenance
- Friction Loss and Water Velocity Chart
- Light Recycling Program Information
- 2018 Warming Trends Mini Catalogue
- 2018-Atlantic-Catalog
- How-to Articles
- Pond Building Basics - Where Do I Start?
- Atlantic Water Garden - Pond Guide
- Atlantic Water Garden - Pond-Free Guide
- Atlantic Water Garden - Pond Pump Guide
- Atlantic Water Garden - Water Feature Guide
- Everything Needed To Build a Water Garden
- Everything Needed To Build a Pond Free Water Feature
- Everything Needed To Build a Koi Pond
- Oase Pondovac - Trouble Shooting
- OASE Bitron C Ultraviolet Water Clarifier (video)
- Filtrific The Pondless Problem Solver!
- Eco-Blox Assembly Instructions (video)
- How-to Assemble Atlantic's Eco-Blox (video)
- Eco-Rise Installation Diagram
- Installing an Atlantic Water Garden Eco-Rise System
- Atlantic Water Garden - Tidal Wave TT Pump Maintenance (video)
- Atlantic Water Garden - Tidal Wave TW Pump Maintenance (video)
- Atlantic Colorfalls: How to Winterize
- Atlantic Pond Protector Installation (video)
- PondGard (EPDM )Technical Guide and Manual
- How to Deal with Pond Algae?
- Pond Health - Spring/Summer Cleaner (video)
- Easy Pond Winterizing System (video)
- Pond Sludge Removal Without Vacuuming (video)
- Pond Health - Eliminate Ammonia in Your Water
- Pond Clarification (video)
- Benefits of Barley in your Pond (video)
- What is KH, and Total Alkalinity (video)
- How To Test Your Pond Water Chemistry
- Hudson Valve Troubleshooting & FAQ
- UV Bulb Replacement - Pond Water Treatment
- PVC Installation Tips: How to Glue PVC Pipe
- Thread Sealants - Teflon Tape or Paste?
- Product Info
- Oase Filtral UVC 700 - All in One Pump & Filter System
- Pentair All in One Pump & Filter System
- Oase Aquamax Eco Classic (video)
- Oase Aquamax Eco Premium (video)
- OASE filter pump video - Aquamax Eco (video)
- OASE Filtoclear 3000 (video)
- OASE Filtoclear 16000 (video)
- OASE Filtoclear (video)
- OASE Filters for Small Ponds
- OASE BioSmart 5.1 (5000) video
- OASE Biotec Screenmatic Overview (video)
- Oase Pondovac 4 - Action Video
- Filtrific Filter Tank and Expansion Tank demo (video)
- TidalWave3 TT Series Pumps from Atlantic Water Gardens
- The Atlantic Variable Speed Controller
- Atlantic Water Gardens - Colour Changing Vases (video)
- The Atlantic Colour Changing Colorfalls
- Inside the Shinmaywa Pump
- NEW Water Pump from Shinmaywa
- String Algae or Blanket Weed Problems?
- Microbe-Lift PBL Professional Blend Bacteria
- Fish Food Enriched with Beneficial Bacteria (video)
- Blue Diamond Aeration Pumps and Diffusers
- Kasco Pond Fountain
- Kasco Marine 3400VFX Aerating Fountain Assembly (video)
- Rockin Foam - pond and waterfall foam: FAQ
- Rainwater Harvesting
- General Information
- What is Rainwater Harvesting
- Rainwater Harvesting FAQ
- Water Conservation Tips
- Is Drinking Rainwater Safe?
- Basic Rainwater Harvesting System and its Components
- Rainwater Rewards Program & Stormwater Utility
- District Offering Big Cash Rebates for Rainwater Harvesters
- Winterize Your Rainwater Harvesting System
- Uniseal - Innovative Pipe Penetration Seals
- Bulk Tubing and Hose
- Pump Maintenance
- CANARM and the City of Victoria Rainwater Harvesting Initiatives
- ARCSA Training a HUGE Hit!
- How-to Articles
- Clean Rain Ultra Installation (video)
- How To Calculate Rainwater Catchment and Volume
- PVC Installation Tips: How to Glue PVC Pipe
- Thread Sealants - Teflon Tape or Paste?
- Product Info
- Leaf Eater Advanced
- Clean Rain Ultra (video)
- Wisy Vortex Rainwater Harvesting Filter (video)
- Premier Plastics Vertical Water Tanks, Septic Tanks and Pump Out Chambers
- Jobe Floats and Valves
- NEW Water Pump from Shinmaywa
- Rain Barrel Soaker Hose
- Sump & Wastewater
- General Information
- Living on a Septic System
- Where Does The Wastewater Go?
- 6 Signs your Septic Systems Needs to Be Pumped
- 9 Things You Should NEVER Flush Down The Toilet
- Sizing a Septic System
- Pump Maintenance
- Bulk Tubing and Hose
- Friction Loss and Water Velocity Chart
- Total Cost of Ownership (TCO) - Water Pump
- How-to Articles
- It's Sump Pump Time!
- Prevent Frozen Septic Systems in Winter
- PVC Installation Tips: How to Glue PVC Pipe
- Thread Sealants - Teflon Tape or Paste?
- Product Info
- SJE EZ Series In-Site CL Data Logging Control Panel
- SJE-Rhombus EZ Series In-Site CL Control Panel (video)
- Why Homeowners Need a Battery-Powered Backup Sump Pump System
- Flood Buzz Pro - Leak Alarm (video)
- Septic Systems, Beneficial Bacteria and Pro Pump FAQ
- NEW Water Pump from Shinmaywa
- Inside the Shinmaywa Pump
- Leader BVP Heavy Duty Solids Handling Pump
- Little Giant Grinder Pump (video)
- Red Lion Gas Powered Pumps
- Premier Plastics Vertical Water Tanks, Septic Tanks and Pump Out Chambers
- Swimming Pools
- General Information
- Swimming Pool FAQ
- Common Misconceptions about Pool & Spa Care
- Chemical Dosage Charts for Swimming Pools
- Chlorine vs. Bromine
- Pool and Spa Water Conservation Tips
- Bulk Tubing and Hose
- Friction Loss of Common Pool System Components
- Friction Loss and Water Velocity Chart
- Chemical Resistance Charts
- Total Cost of Ownership (TCO) - Water Pump
- How-to Articles
- Testing Your Swimming Pool Water
- What is pH level or balance - Swimming Pool Maintenance
- What is Total Alkalinity - Swimming Pool Maintenance
- Water Hardness / Calcium Hardness - Swimming Pools
- What to do when cloudy swimming pool water strikes
- Salt Dosage Chart for Swimming Pools
- Spring & Summer Pool Opening Tips
- Closing Your Swimming Pool for the Winter (Winterizing)
- How To Estimate the Total Volume of a Pool or Pond
- PVC Installation Tips: How to Glue PVC Pipe
- Thread Sealants - Teflon Tape or Paste?
- Product Info
- The NEW but Original - Jacuzzi!
- Dolphin Supreme M400
- The NEW but Original - Jacuzzi!
- Aqua Finesse - Simple Pool Water Care
- Hayward H-Series Natural Gas Heater with Electronic Ignition
- Heatsavr - The Liquid Pool Cover (video)
- Our Best Pond or Pool Net - Pond Shark Pro
- Water Features
- General Information
- Bulk Tubing and Hose
- Pump Maintenance
- Total Cost of Ownership (TCO) - Water Pump
- Friction Loss and Water Velocity Chart
- Warming Trends Mini Catalogue
- How-to Articles
- Everything Needed To Build a Water Garden
- Eco-Rise Installation Diagram
- Thread Sealants - Teflon Tape or Paste?
- Water Treatment
- General Information
- Boil Water Advisory Information
- POE (Point-of-Entry) vs POU (Point-of-Use) Water Filtration Systems
- How Does Ultraviolet Water Treatment Work?
- UV (ultraviolet) Water Disinfection FAQ
- UV Dosage Chart
- Tap Water Filtration
- Under the Sink Filtration Installation Diagram
- Well Water Testing
- Should I disinfect or chlorinate my well?
- Hard Water vs Soft Water
- Why does my hot water smell like rotten eggs?
- What are Tannins in my Groundwater
- Water Conditioning Basics - Water Analysis
- Top 5 Contaminants That You Can Remove From Drinking Water
- What You Need to Know About Lead In Your Water
- Water Conditioning Basics - Sizing Parameters
- Water Conditioning Basics - The Hydrologic Cycle
- Water Conditioning Basics - Guidelines for Solving Water Problems
- Cysts in Water Supply: Treating Water Born Disease Causing Protozoa
- Pump Maintenance
- Victoria Water History
- Bulk Tubing and Hose
- Chemical Resistance Charts
- Light Recycling Program Information
- How-to Articles
- ECOMIX (Video)
- Reverse Osmosis Installation Diagram
- How Water Softening Works
- How To Clean, Replace and Reset My Trojan UV MAX System
- How to Reset Your UV Dynamics After Replacing the Lamp
- PVC Installation Tips: How to Glue PVC Pipe
- Thread Sealants - Teflon Tape or Paste?
- Product Info
- UV Dynamics - Ultraviolet Disinfection Systems
- Stenner - Proportional Chemical Feed System
- Flood Buzz Pro - Leak Alarm (video)
- Wells & Groundwater
- General Information
- What is Ground Water (Video)
- Groundwater FAQ
- Well Water Testing
- Constant Pressure Systems for Low or Fluctuating Water Pressure
- Top 5 Cause of Low Water Pressure
- What's In Your Well?
- Victoria Water History
- Water Conservation Tips
- Understanding Drought Levels and Water Restrictions
- Pump Maintenance
- Uniseal - Innovative Pipe Penetration Seals
- Bulk Tubing and Hose
- Friction Loss and Water Velocity Chart
- Filter Screen Mesh to Micron Conversion Chart
- Well Decommissioning
- Well Protection & Groundwater Stewardship
- Groundwater Protection Act - British Columbia
- Licensing Groundwater Users - British Columbia
- Water Sustainability Act - British Columbia
- Why A Submersible Motor Costs What It Does
- Total Cost of Ownership (TCO) - Water Pump
- Choose the Right Pump by Calculating Total Dynamic Head
- Water Systems Glossary
- Unit Conversion Chart
- How-to Articles
- Managing Your Well During a Drought or Dry Spell
- Servicing a Water Pressure Tank
- Winterizing Your Water Well System
- #1 Cause of Pump Failure
- What are Tannins in my Groundwater
- Franklin Electric Jet Pump Motors (video)
- PVC Installation Tips: How to Glue PVC Pipe
- Thread Sealants - Teflon Tape or Paste?
- Product Info
- Franklin Electric Inline 400 Pressure Boosting System by Franklin Electric
- Franklin Electric 3200 Series Groundwater Pumps
- Red Lion Gas Powered Pumps
- Franklin Electric Vertical Multi-stage Pumps
- New Franklin Electric Connect App
- Franklin Electric AIM Manual
Thursday, December 17, 2015
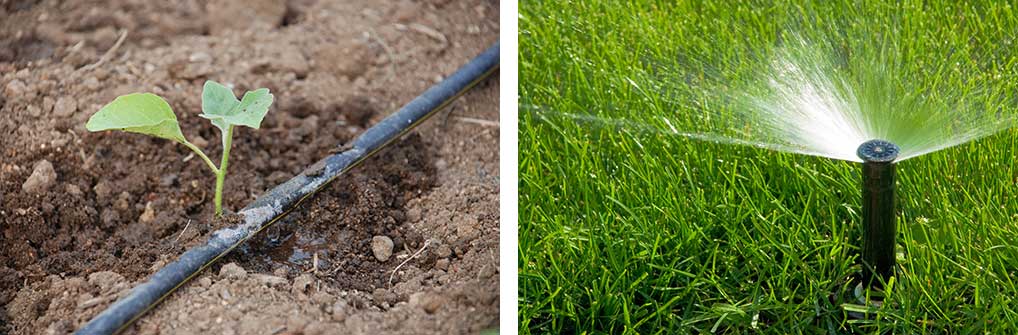
WELCOME TO IRRIGATION SPRAY SYSTEMS
This article was designed to introduce you to spray systems, and contains some of the information you will need to get started.
(For more advanced instructions on how to design and install an underground irrigation system CLICK HERE)
The reason you would use a spray system over a direct watering system, is the required watering area is bigger than or too densely planted to make it economical. With a spray system you can cover a larger area with fewer heads. Whether you go to a spray or direct watering system you can connect them to your automatic sprinkler system.
GETTING STARTED
- Draw a plan of your landscape.
- Determine the area's that are to be sprayed.
- Determine the style or styles of watering you will use.
- Determine the amount of time per week you will have the system on.
Step 1
Draw a plan of your area to be watered (use the graph paper on the back page). Include all plants, trees, rocks and ponds. You want to illustrate every thing that will be watered and anything that might get in the
way of your watering on this plan.
Step 2
Take a close look at your drawing and determine the area that is to be watered. This is the time to decide if an area is to be sprayed or direct watered.
Step 3
Determine the style or styles of watering to be used. There are a range of heads each with their own specific application.
Spectrum 360 vortex spray
Sprays a 360 vortex circle. This spray has a fully adjustable cap that can be adjusted to a range of 0 to 10 foot spray, and from 0 to 20 gallons per hour.
Vari-jet shrubbler
Available in both 360 and 180 degree circle. This head provides the versatility of a dripper, bubbler or sprayer. By turning the head counter clockwise you range from a 1 GPH dripper to a 3 GPH bubbler or a finger spray with a maximum output of 10 GPH with a diameter of 2 feet.
Micro Vari-Flow jet spray
A Vari-Flow valve used with a jet nozzle. With the adjustable valve you can fit the jet nozzle to your job. From 16.3 to 28.8 GPH and 18.4 to 26.3 feet (with the 360-18 nozzle).
Step 4
Determine the amount of time per week you will have the system on. Remember that this is only a guide line. The exact duration and frequency of watering will depend upon temperature, wind conditions, soil types, plant variety and local restrictions. Mature plants have deeper roots, requiring a longer watering cycle. To double check your calculations after the system is running, dig down next to a plant to see the depth the water has reached. If the soil is dry within 12" of the surface, you are under-watering and more time will be required.
The hookup is your next step. Whether you use electric or manual valves, you will need a filter, pressure/flow regulator, and a back-flow preventer. A filter is needed because the holes in the different styles are so small that they will plug up very fast without it. A pressure/flow regulator is required because the working pressure of drip irrigation is between 10 and 20 PSI, and the flow regulator will adjust the flow to give the emitters the water they need - not more. The back-flow preventer is required by law to prevent the water in your pipes from re-entering your homes water supply.
Next look at your head layout on both your plan and site. Draw out where you think the supply line should be (you're the one who is going to be digging the trenches, so keep your layout to the minimum). You have completed the design which is the part some people find the hardest, now it's just a matter of putting it in. Take your time, and try not to get frustrated. All layouts get changed once the digging gets started. Before you back fill, run the system and see if it covers the area's and if there are any leaks (all of us have forgotten to glue a fitting or put a clamp on so do not feel bad if you do too). You are now ready to back fill your trenches. Besides checking your run time you are done for now.
Each spring you may have to update your system as you change plants or your lay outs.
| One Piece Performance Chart | |||||||
|---|---|---|---|---|---|---|---|
| Recommended Operating Pressure | Black .03 Orifice | Blue .04 Orifice | Red .075 Orifice | ||||
| Spray Pattern | press PSI | Flow Rate GPH | Radius Feet | Flow Rate GPH | Radius Feet | Flow Rate GPH | Diameter Feet |
| 360 deg. Circle | 15 | 5.0 | 9.0 | 21.6 | |||
| 20 | 6.0 | 8.0 | 10.5 | 7.8 | 24.0 | 14.0 | |
| 25 | 6.8 | 11.6 | 27.4 | ||||
| 180 deg. Circle | 15 | 5.0 | 9.0 | 21.6 | |||
| 20 | 6.0 | 8.0 | 10.5 | 7.8 | 24.0 | 15.0 | |
| 25 | 6.8 | 11.6 | 27.4 | ||||
| 90 deg. Circle | 15 | 5.0 | 9.0 | 21.6 | |||
| 20 | 6.0 | 8.0 | 10.5 | 7.8 | 24.0 | 11.0 | |
| 25 | 6.8 | (radius) | 11.6 | (radius) | 27.4 | (radius) | |
| Recommended Operating Pressure 20 PSI |
| Vari-Jets w/Spray Cap | ||||||
|---|---|---|---|---|---|---|
| Spray Pattern | ||||||
| Desc. | Pressure PSI. | Flow GPH. | 360°x18 Diameter Ft. | 180° Radius Ft. Diameter Ft. | Mist Flow GPH | Mist Diameter Ft. |
| 0.06 Orifice | 10 | Up to 16.3 | Up to 18.4 | Up to 6.7 | 4.0 | 3.0 |
| 15 | Up to 20.1 | Up to 22.6 | Up to 8.1 | 4.8 | 2.6 | |
| 20 | Up to 23.4 | Up to 25.7 | Up to 9.5 | 5.8 | 2.9 | |
| 25 | Up to 26.2 | Up to 26.7 | Up to 10.1 | 6.2 | 2.8 | |
| 30 | Up to 28.8 | Up to 26.3 | Up to 10.6 | - | - | |
| Recommended Operating Pressure 20 PSI |
| Sprays | ||||
|---|---|---|---|---|
| Item# | Flow | Diameter | Pressure | |
| MI/FSF | Finger Spray 360 | 0-10GPH | 0-3 Ft. | 20 PSI |
| MI/FSH | Finger Spray 180 | 0-10GPH | 0-3 Ft. | 20 PSI |
| MI/VS360 | Vortex 360 | 0-24GPH | 0-14 Ft. | 25 PSI |
| MI/RS12 | Mini Rotary (Blue) | 11.7 GPH | 19 Ft. | 25 PSI |
| MI/RS18 | Mini Rotary (Green) | 19.5 GPH | 21 Ft. | 25 PSI |
| Dripline Tubing | ||||
|---|---|---|---|---|
| Item# | Flow | Diameter | Pressure | |
| MI/DRIPIN1/4X12 | 1/4"" x 12"" Spacing | 1/2 GPH per ft. | 15 PSI | 33 Ft. Max. Run |
| MI/DRIPIN1/4X6 | 1/4"" x 6"" Spacing | 1 GPH per ft. | 15 PSI | 19 Ft. Max. Run |