- Hot Tubs & Spas
- General Information
- Chemical Dosage Charts for Hot Tubs
- Hot Tub FAQ
- How Hot Should my Hot Tub/Spa Be?
- Ultraviolet Disinfection (UV-C) for Hot Tubs
- Bulk Tubing and Hose
- Total Cost of Ownership (TCO) - Water Pump
- How-to Articles
- How to Get Rid of Algae in a Hot Tub
- How to Restart Your Hot Tub If You Haven’t Used it in a Year
- How to Test Your Hot Tub Water
- How to Properly Add Chemicals to Your Hot Tub
- PVC Installation Tips: How to Glue PVC Pipe
- Thread Sealants - Teflon Tape or Paste?
- Irrigation
- General Information
- Understanding Drought Levels and Water Restrictions
- Vancouver Island Water Restrictions
- Vancouver Island Current Water Restriction Stages
- Filter Screen Mesh to Micron Conversion Chart
- Comox Valley Smart Control Irrigation Rebate
- Victoria Water History
- Friction Loss and Water Velocity Chart
- Bulk Tubing and Hose
- 2018 Weathermatic Catalogue
- How-to Articles
- Do-It-Yourself Irrigation Design and Installation Guide
- Introduction to Micro-Irrigation
- Rain Barrel Soaker Hose
- Tips and Caring for Your Soaker hose
- PVC Installation Tips: How to Glue PVC Pipe
- Thread Sealants - Teflon Tape or Paste?
- Product Info
- Weathermatic
- Weathermatic SL800 Bundle with Rain/Freeze Sensor
- Weathermatic T3 Turbo Rotor
- Weathermatic N-100 Nitro Valve
- Mr. Soaker Hose Basics
- Mr. Soaker Hose - Frequently Asked Questions
- Drip In Soaker Dripline for Irrigation
- Lake & Lagoon Management
- General Information
- Benefits of Pond and Lake Aeration (video)
- Previous Next List Information Item Actions NAME Kasco Fountains VX Series Overview (video)
- Pump Maintenance
- Total Cost of Ownership (TCO) - Water Pump
- Bulk Tubing and Hose
- How-to Articles
- Kasco Floating Fountain Installations
- Preventing Ice Damage - Kasco Marine De-icing Guide
- PVC Installation Tips: How to Glue PVC Pipe
- Thread Sealants - Teflon Tape or Paste?
- Product Info
- KASCO Marine
- Kasco LED Fountain Lights
- Kasco Marine 3400VFX Aerating Fountain Assembly (video)
- Kasco Aerating Fountains (video)
- Microbe-Lift PBL Professional Blend Bacteria
- Kasco De-Icers
- Kasco Robust-Aire Diffuser Overview (video)
- NEW Water Pump from Shinmaywa
- Landscape Lighting
- General Information
- Benefits of Landscape Lighting (pt.1) (video)
- Premium Outdoor Lighting vs Cheaper Brands
- Light Recycling Program Information
- How-to Articles
- Construct a Low Voltage Transformer Stand (video)
- Security Lighting at it's Best - Cast LED Perimeter Light (video)
- Outdoor Lighting Wiring Techniques - Crimp and Heat Shrink (video)
- Product Info
- DH Lights: Low Voltage Outdoor Lighting, Quality & Value
- Brilliance Flex Strip Lighting
- CAST Lighting FAQ
- Solid Bronze Bullet Light from Cast Lighting - (video)
- The CAST Niche Light (video)
- Tree Light from Cast Lighting (video)
- Outdoor Cooking
- General Information
- Southern Barbecue Comes to Van Isle Water
- How-to Articles
- Memphis Grills Outdoor Cooking Recipes
- Product Info
- Memphis Grills - A Revolution in Outdoor Cooking
- Memphis Grill FAQ
- Infusion Roaster - Turkey Cannon
- Create a Cutting Edge Fire Feature with Warming Trends' Cross-Fire Burner System
- Ponds & Watergardens
- General Information
- Everything Needed To Build a Koi Pond
- Everything Needed To Build a Pond Free Water Feature
- Benefits of having a Pond
- Do I Really Need a Pond Filter?
- Aeration - The Benefits of Bubbles
- Benefits of Pond and Lake Aeration (video)
- Waterfall Flow Chart
- It Seemed Like a Good Idea at the Time
- PondGard (EPDM) Decorative Applications Guide
- Pond Winterizing Tips and Tricks
- The Oasis Pump Vault - Under the Hood
- 2018 Atlantic Water Garden Catalogue
- Total Cost of Ownership (TCO) - Water Pump
- Bulk Tubing and Hose
- Pump Maintenance
- Friction Loss and Water Velocity Chart
- Light Recycling Program Information
- 2018 Warming Trends Mini Catalogue
- 2018-Atlantic-Catalog
- How-to Articles
- Pond Building Basics - Where Do I Start?
- Atlantic Water Garden - Pond Guide
- Atlantic Water Garden - Pond-Free Guide
- Atlantic Water Garden - Pond Pump Guide
- Atlantic Water Garden - Water Feature Guide
- Everything Needed To Build a Water Garden
- Everything Needed To Build a Pond Free Water Feature
- Everything Needed To Build a Koi Pond
- Oase Pondovac - Trouble Shooting
- OASE Bitron C Ultraviolet Water Clarifier (video)
- Filtrific The Pondless Problem Solver!
- Eco-Blox Assembly Instructions (video)
- How-to Assemble Atlantic's Eco-Blox (video)
- Eco-Rise Installation Diagram
- Installing an Atlantic Water Garden Eco-Rise System
- Atlantic Water Garden - Tidal Wave TT Pump Maintenance (video)
- Atlantic Water Garden - Tidal Wave TW Pump Maintenance (video)
- Atlantic Colorfalls: How to Winterize
- Atlantic Pond Protector Installation (video)
- PondGard (EPDM )Technical Guide and Manual
- How to Deal with Pond Algae?
- Pond Health - Spring/Summer Cleaner (video)
- Easy Pond Winterizing System (video)
- Pond Sludge Removal Without Vacuuming (video)
- Pond Health - Eliminate Ammonia in Your Water
- Pond Clarification (video)
- Benefits of Barley in your Pond (video)
- What is KH, and Total Alkalinity (video)
- How To Test Your Pond Water Chemistry
- Hudson Valve Troubleshooting & FAQ
- UV Bulb Replacement - Pond Water Treatment
- PVC Installation Tips: How to Glue PVC Pipe
- Thread Sealants - Teflon Tape or Paste?
- Product Info
- Oase Filtral UVC 700 - All in One Pump & Filter System
- Pentair All in One Pump & Filter System
- Oase Aquamax Eco Classic (video)
- Oase Aquamax Eco Premium (video)
- OASE filter pump video - Aquamax Eco (video)
- OASE Filtoclear 3000 (video)
- OASE Filtoclear 16000 (video)
- OASE Filtoclear (video)
- OASE Filters for Small Ponds
- OASE BioSmart 5.1 (5000) video
- OASE Biotec Screenmatic Overview (video)
- Oase Pondovac 4 - Action Video
- Filtrific Filter Tank and Expansion Tank demo (video)
- TidalWave3 TT Series Pumps from Atlantic Water Gardens
- The Atlantic Variable Speed Controller
- Atlantic Water Gardens - Colour Changing Vases (video)
- The Atlantic Colour Changing Colorfalls
- Inside the Shinmaywa Pump
- NEW Water Pump from Shinmaywa
- String Algae or Blanket Weed Problems?
- Microbe-Lift PBL Professional Blend Bacteria
- Fish Food Enriched with Beneficial Bacteria (video)
- Blue Diamond Aeration Pumps and Diffusers
- Kasco Pond Fountain
- Kasco Marine 3400VFX Aerating Fountain Assembly (video)
- Rockin Foam - pond and waterfall foam: FAQ
- Rainwater Harvesting
- General Information
- What is Rainwater Harvesting
- Rainwater Harvesting FAQ
- Water Conservation Tips
- Is Drinking Rainwater Safe?
- Basic Rainwater Harvesting System and its Components
- Rainwater Rewards Program & Stormwater Utility
- District Offering Big Cash Rebates for Rainwater Harvesters
- Winterize Your Rainwater Harvesting System
- Uniseal - Innovative Pipe Penetration Seals
- Bulk Tubing and Hose
- Pump Maintenance
- CANARM and the City of Victoria Rainwater Harvesting Initiatives
- ARCSA Training a HUGE Hit!
- How-to Articles
- Clean Rain Ultra Installation (video)
- How To Calculate Rainwater Catchment and Volume
- PVC Installation Tips: How to Glue PVC Pipe
- Thread Sealants - Teflon Tape or Paste?
- Product Info
- Leaf Eater Advanced
- Clean Rain Ultra (video)
- Wisy Vortex Rainwater Harvesting Filter (video)
- Premier Plastics Vertical Water Tanks, Septic Tanks and Pump Out Chambers
- Jobe Floats and Valves
- NEW Water Pump from Shinmaywa
- Rain Barrel Soaker Hose
- Sump & Wastewater
- General Information
- Living on a Septic System
- Where Does The Wastewater Go?
- 6 Signs your Septic Systems Needs to Be Pumped
- 9 Things You Should NEVER Flush Down The Toilet
- Sizing a Septic System
- Pump Maintenance
- Bulk Tubing and Hose
- Friction Loss and Water Velocity Chart
- Total Cost of Ownership (TCO) - Water Pump
- How-to Articles
- It's Sump Pump Time!
- Prevent Frozen Septic Systems in Winter
- PVC Installation Tips: How to Glue PVC Pipe
- Thread Sealants - Teflon Tape or Paste?
- Product Info
- SJE EZ Series In-Site CL Data Logging Control Panel
- SJE-Rhombus EZ Series In-Site CL Control Panel (video)
- Why Homeowners Need a Battery-Powered Backup Sump Pump System
- Flood Buzz Pro - Leak Alarm (video)
- Septic Systems, Beneficial Bacteria and Pro Pump FAQ
- NEW Water Pump from Shinmaywa
- Inside the Shinmaywa Pump
- Leader BVP Heavy Duty Solids Handling Pump
- Little Giant Grinder Pump (video)
- Red Lion Gas Powered Pumps
- Premier Plastics Vertical Water Tanks, Septic Tanks and Pump Out Chambers
- Swimming Pools
- General Information
- Swimming Pool FAQ
- Common Misconceptions about Pool & Spa Care
- Chemical Dosage Charts for Swimming Pools
- Chlorine vs. Bromine
- Pool and Spa Water Conservation Tips
- Bulk Tubing and Hose
- Friction Loss of Common Pool System Components
- Friction Loss and Water Velocity Chart
- Chemical Resistance Charts
- Total Cost of Ownership (TCO) - Water Pump
- How-to Articles
- Testing Your Swimming Pool Water
- What is pH level or balance - Swimming Pool Maintenance
- What is Total Alkalinity - Swimming Pool Maintenance
- Water Hardness / Calcium Hardness - Swimming Pools
- What to do when cloudy swimming pool water strikes
- Salt Dosage Chart for Swimming Pools
- Spring & Summer Pool Opening Tips
- Closing Your Swimming Pool for the Winter (Winterizing)
- How To Estimate the Total Volume of a Pool or Pond
- PVC Installation Tips: How to Glue PVC Pipe
- Thread Sealants - Teflon Tape or Paste?
- Product Info
- The NEW but Original - Jacuzzi!
- Dolphin Supreme M400
- The NEW but Original - Jacuzzi!
- Aqua Finesse - Simple Pool Water Care
- Hayward H-Series Natural Gas Heater with Electronic Ignition
- Heatsavr - The Liquid Pool Cover (video)
- Our Best Pond or Pool Net - Pond Shark Pro
- Water Features
- General Information
- Bulk Tubing and Hose
- Pump Maintenance
- Total Cost of Ownership (TCO) - Water Pump
- Friction Loss and Water Velocity Chart
- Warming Trends Mini Catalogue
- How-to Articles
- Everything Needed To Build a Water Garden
- Eco-Rise Installation Diagram
- Thread Sealants - Teflon Tape or Paste?
- Water Treatment
- General Information
- Boil Water Advisory Information
- POE (Point-of-Entry) vs POU (Point-of-Use) Water Filtration Systems
- How Does Ultraviolet Water Treatment Work?
- UV (ultraviolet) Water Disinfection FAQ
- UV Dosage Chart
- Tap Water Filtration
- Under the Sink Filtration Installation Diagram
- Well Water Testing
- Should I disinfect or chlorinate my well?
- Hard Water vs Soft Water
- Why does my hot water smell like rotten eggs?
- What are Tannins in my Groundwater
- Water Conditioning Basics - Water Analysis
- Top 5 Contaminants That You Can Remove From Drinking Water
- What You Need to Know About Lead In Your Water
- Water Conditioning Basics - Sizing Parameters
- Water Conditioning Basics - The Hydrologic Cycle
- Water Conditioning Basics - Guidelines for Solving Water Problems
- Cysts in Water Supply: Treating Water Born Disease Causing Protozoa
- Pump Maintenance
- Victoria Water History
- Bulk Tubing and Hose
- Chemical Resistance Charts
- Light Recycling Program Information
- How-to Articles
- ECOMIX (Video)
- Reverse Osmosis Installation Diagram
- How Water Softening Works
- How To Clean, Replace and Reset My Trojan UV MAX System
- How to Reset Your UV Dynamics After Replacing the Lamp
- PVC Installation Tips: How to Glue PVC Pipe
- Thread Sealants - Teflon Tape or Paste?
- Product Info
- SWIFT Refrigerator Filters - New Product Line
- UV Dynamics - Ultraviolet Disinfection Systems
- Stenner - Proportional Chemical Feed System
- Flood Buzz Pro - Leak Alarm (video)
- Wells & Groundwater
- General Information
- What is Ground Water (Video)
- Groundwater FAQ
- Well Water Testing
- Constant Pressure Systems for Low or Fluctuating Water Pressure
- Top 5 Cause of Low Water Pressure
- What's In Your Well?
- Victoria Water History
- Water Conservation Tips
- Understanding Drought Levels and Water Restrictions
- Pump Maintenance
- Uniseal - Innovative Pipe Penetration Seals
- Bulk Tubing and Hose
- Friction Loss and Water Velocity Chart
- Filter Screen Mesh to Micron Conversion Chart
- Well Decommissioning
- Well Protection & Groundwater Stewardship
- Groundwater Protection Act - British Columbia
- Licensing Groundwater Users - British Columbia
- Water Sustainability Act - British Columbia
- Why A Submersible Motor Costs What It Does
- Total Cost of Ownership (TCO) - Water Pump
- Choose the Right Pump by Calculating Total Dynamic Head
- Water Systems Glossary
- Unit Conversion Chart
- How-to Articles
- Managing Your Well During a Drought or Dry Spell
- Servicing a Water Pressure Tank
- Winterizing Your Water Well System
- #1 Cause of Pump Failure
- What are Tannins in my Groundwater
- Franklin Electric Jet Pump Motors (video)
- PVC Installation Tips: How to Glue PVC Pipe
- Thread Sealants - Teflon Tape or Paste?
- Product Info
- Franklin Electric Inline 400 Pressure Boosting System by Franklin Electric
- Franklin Electric 3200 Series Groundwater Pumps
- Red Lion Gas Powered Pumps
- Franklin Electric Vertical Multi-stage Pumps
- New Franklin Electric Connect App
- Franklin Electric AIM Manual
Memphis Grills has a variety of delicious recipes that can be used everyday of the week all year round!
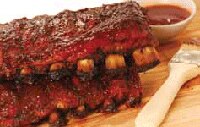
- Award Winning Ribs!
- BBQ Chicken Pizza
- Slow Smoked Pulled Pork
- Candy Smoked Salmon
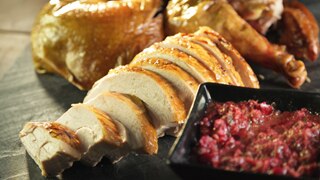
- Double Whiskey-Smoked Turkey
- Fire-Roasted Apples
- Beer Can Turkey
- Chicken Quarters Braised with Jalapeno, Lime and Garlic
- Chocolate Chip Cookies
- Grilled Focaccia Bread
- Low 'N' Slow Smoked Beef Brisket
- Quick Ribs
- Roasted Leg of Lamb
- Cherry Smoked Duck (video)
- Smoked Trout
- Smoked Garlic Aioli
- Smoked and Baked - Mac & Cheese
- Savory Citrus Roasted Turkey
Savory Citrus Roasted Turkey
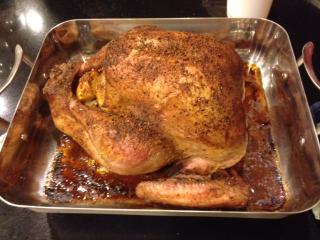
Prep Time: 10 mins
Ingredients:
One large turkey
4-6 Fresh citrus fruits (lemons, limes, oranges)
Olive oil
Salt and pepper
Preparation:
1. Preheat Grill to 350 degrees
2. Rub fresh turkey with olive oil (inside and outside)
3. Generous sprinkle of coarse salt and fresh cracked pepper inside cavity
4. Zest a few tablespoons from the citrus fruits and set aside
5. Stuff cavity with fresh citrus - lemons, oranges and limes cut into quarters
6. Season outside with coarse salt, fresh cracked pepper, and zest from citrus fruits
7. Set temperature probe to 165 degrees and place turkey on grill and the probe into breast
8. Cook until internal temp reaches 165 (cook time depends on weight - see table below)
Smoked and Baked - Mac & Cheese
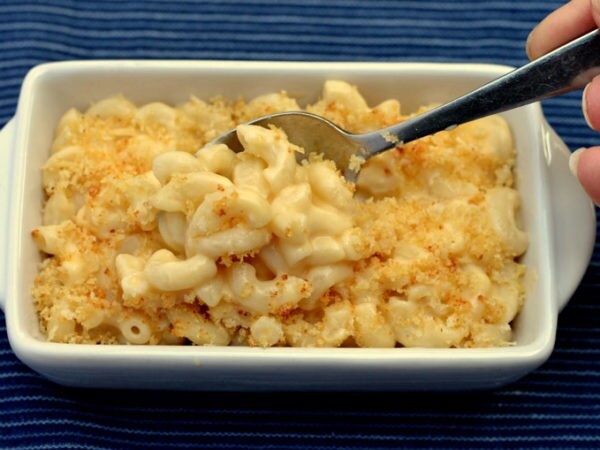
2 tsp kosher salt flakes
5 quarts (20 Cups) of water
1 lb dried elbow macaroni noodles
3 Tbsp butter, melted
2 Cup panko bread crumbs
1 tsp garlic granules
1 Cup parmesan cheese, finely grated
½ Cup butter
6 Tbsp unbleached white flour
½ tsp pepper
2 tsp mustard powder
4 Cup milk
¾ Cup heavy cream
6 Cup white & yellow shredded cheddar cheese, old or extra-old
Preparation:
1. Mix together the salt and water in a large pot and bring the liquid to a rolling boil. Add the elbow macaroni and keep an eye on the pot while it returns to the boiling point. Adjust the heat under the pot so the liquid continues to boil gently but not so rapidly it foams over the top of the pot. Cook the pasta until it reaches the al dente stage (about 8-10 minutes). Drain and set aside.
2. To make the crunchy topping, mix together the melted butter, panko bread crumbs and garlic granules. Add ½ C of the parmesan cheese reserving the rest for later use. Set the topping aside.
3. Now for the fun - there's two ways you can go when cooking the mac and cheese on the Memphis. If you have time try smoking for two hours at a lower setting (225 F) or simply pre-heat the Memphis to 350 F and bake for 35 - 40 minutes. While the Memphis is pre-heating make the sauce and assemble the mac and cheese.
4. Melt the butter in a medium size pot. Add the pepper and mustard powder. Whisk in the flour to make a roux. Cook the roux over medium high heat, whisking constantly for 2 minutes. Slowly add the milk and cream in a steady stream while continuing the whisking motion to prevent lumps from forming. Continue to stir until the mixture thickens into a sauce.
5. Add the reserved parmesan and cheddar cheeses, stirring while they melt into the sauce. Remove from the heat.
6. Pour the cheese sauce over the drained noodles and toss to make sure each noodle gets coated evenly.
7. Spoon the noodle/sauce mixture into a medium sized cast iron frying pan that has been lightly coated with oil. Sprinkle the topping evening over the surface of the noodles and place the frying pan in the middle of the lower rack inside the pre-heated Memphis. The cheese sauce will be bubbly and the topping will turn a nice golden brown when the mac and cheese is done.
Smoked Garlic Aioli
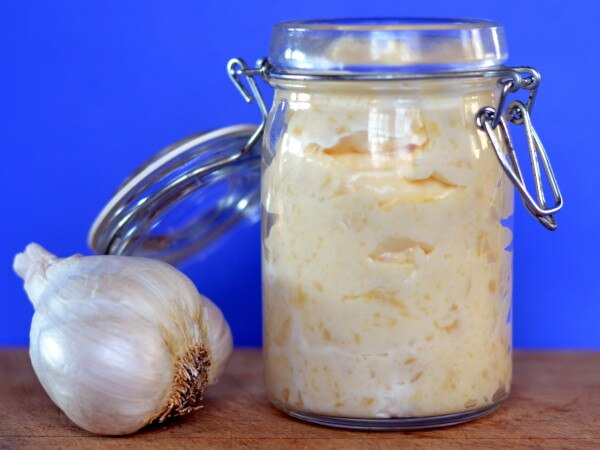
1 whole garlic bulb
1 tbsp olive oil
Pinch of salt
1 large egg yolk (or two small yokes)
2 tsp fresh lemon juice
½ tsp Dijon mustard
2/3 cup oil
Preparation:
1. Set Intelligent Temperature Control (ITC) to 225 degrees F.
2. Remove any loose parts of the papery coating from the outside of the garlic bulb.
3. Using a sharp knife slice off the top of the bulb exposing the top part of the individual cloves.
4. Rub a small amount of olive oil over the surface of the bulb
5. Place the bulb inside the pre-heated Memphis grill and close the lid.
6. Smoke in the grill for 1 ½ hours or until the cloves are soft but not mushy. Remove and let cool for 10 - 15 minutes.
7. Separate the garlic bulb into individual cloves. Squeeze the cloves out of their covers onto a small flat plate. Mash the cloves into a paste using a small fork and set aside.
8. Put the egg yolk, lemon juice and Dijon mustard into the blender container and process on high speed until well blended. Remove the stopper from the top of your blender and drizzle the oil very slowly into the egg yolk mixture while continuing to process on high speed. The resulting combination will begin to turn an opaque off-white colour as the oil/egg yolk mixture emulsifies. Take your time with this procedure.
9. When all the oil has been incorporated into the aioli stop the blender and add the mashed garlic. Pulse a few times to blend the smoked/roasted garlic paste with the rest of the aioli sauce. Store in the fridge, in an air-tight container.
Smoked Trout
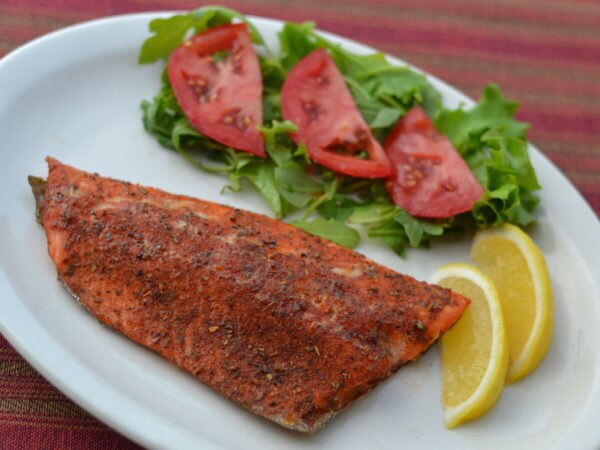
2 tbsp brown sugar
1 ½ tsp kosher salt
1 tsp dried oregano
½ tsp dried thyme
½ tsp onion powder
½ tsp chili powder
¼ tsp freshly ground black pepper
4 trout filets - skin on one side, (2 lbs)
Lemon wedges
Preparation:
1. Pre-heat the Memphis Pellet Grill to 225 F.
2. A properly prepared fish filet will have the pin bones removed, but I always check for them by rubbing my fingers along the center of each filet. They are small and one or two is sometimes missed. Use tweezers or small needle-nose pliers to remove any pin bones you find.
3. Make the rub by mixing the brown sugar, salt, oregano, thyme, onion powder, chili powder and pepper. Pat the rub into the top surface of each trout filet.
4. Place the prepared filets on the lower rack of the Memphis and close the lid. Smoke the fish until the filets internal temperature reaches 140 F. This will take from 1 1/2 - 2 hours depending on the thickness of your trout filets.
5. Serve with lemon wedges on the side.
Cherry Smoked Duck
Ingredients:
One 5 lbs Duck
Cherry Wood Pellets
1 Shallot
1 Cinnamon Stick
"Sweet and Salty" Rub:
Granulated Sugar
Salt
Black Pepper
Grounded Cinnamon (for a touch of sweetness)
Cumin (for a aromatic spice)
Olive Oil
The Smoky Chipotle Cherry Sauce:
3 Cups of Cherries
Sugar
1 Cinnamon Stick
Red Wine Vinegar
Port Wine
1 Cup of Chicken or Duck Stock
Lemon
Chopped Chipotle Chili
Cornstarch
A little quiche cherry brandy
Butter
Preparation (watch video for full details):
Load the hopper with cherry wood pellet and set the smoker temperature for 250 degrees.
Unwrap the 5lbs duck and put it on a wire rack and leave it in the refrigerator over-night to dry out the skin. You can accelerate the drying process with a hair dryer. Set the hair dryer on the lowest temperature setting and run it over the skin. You want the skin to be dry so it becomes crispier during the cooking process (that means better duck skin when you serve the duck).
Next, you'll want to rub the duck with a "Sweet and Salty" rub. Mix these ingredients (found above) together with a fork. Take some of the rub and sprinkle in the cavity of the duck and place a cinnamon stick and a shallot in the cavity as well.
We suggest you watch the video during this process: Make sure the neck skin is folded under the body then fold the tailpiece into the cavity. Push the legs to the side of the duck and take a piece of butcher string (about 20 inches long) and slide it under the tail of the duck. Loop it over to make a double loop and pull tight to pin the drum sticks to the side of the deck. Then pull the string over the legs and under the wings then turn the duck over. Grab the string, make a double loop, and then slide the string back as tightly as possible. Tie it off and cut off any excess. The last thing you'll do is just pull the neck skin tight and cut it off.
Next, poke the skin (but not the meat underneath it), this helps release some of the excess fat in the skin. Base the duck with a little extra virgin olive oil and brush it over the outside of the duck. Then season the outside of the duck with the remaining "Sweet and Salty" rub.
Open the smoker and place the duck in the smoke chamber. The smoker has a temperature probe and you want to insert the probe into the deepest part of the thigh. The smoking time for this preliminary stage is about 2 1/2 hours. We are looking for an internal temperature of 145 degrees.
Now make the Smoky Chipotle Cherry Sauce.
The Cherry sauce starts with a sweet and sour mixture called a "Biga Hot". First, you make a caramel that is a berth sugar sauce. Start with sugar and water then cover the pot to speed up the boiling process. Meanwhile, pit the fresh cherries for the sauce. The sugar should now start to caramelize burn; you'll want to make it a little darker. Once the mixture is well caramelized, add red wine vinegar mixture. The mixture is going to hiss and sputter like Mount Vesuvius so you want to whisk it to dissolve the sugar. Add port wine then freshly grated lemon zest. Cut the lemon in half and add a squeeze of fresh lemon juice. Whisk in 1 CUP of chicken or duck stock and add a cinnamon stock to reinforce that cinnamon flavour in the rub and chopped chipotle chili. Bring the mixture to a boil and once the sauce boils, add the fresh cherries. Simmer until the cherries are soft (about 3-minutes). To thicken the sauce, we are going to make a "Slurry". This is a mixture of cornstarch and a little quiche cherry brandy. Dissolve the cornstarch in the quiche, which will reinforce the flavour of the fresh cherries. To thicken the sauce, stir in the slurry. You don't want it to thick, just slightly thickened. The last thing you want to do is just add a spoonful of butter and of course, don't forget the salt and pepper!
After the 2 1/2 hours with the duck in the smoker, it's now time to check on it. You can see it is beautifully brown and still looks moist with nice smoke coming out. Now, you want to increase the temperature of the smoker to 400 degrees. Crisp up the skin will take about another hour of cooking.
Roasted Leg of Lamb
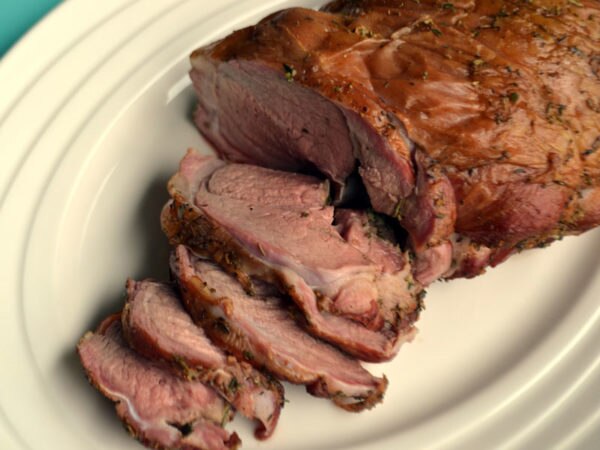
4 - 5 lb leg of lamb, deboned and butterflied
2 tbsp Dijon mustard
¼ cup fresh rosemary leaves, minced (or 1 Tbsp dried)
¼ cup fresh thyme leaves, minced (or 1 Tbsp dried)
6 garlic cloves (minced)
2 tsp kosher salt flakes
2 tsp freshly ground black pepper
Preparation:
1. Preheat Memphis Pellet Grill to 400 degrees F.
2. Lay the butterflied leg of lamb roast out on a clean flat surface. Rub both the inside and outside of the roast with the Dijon mustard.
3. In a small bowl, mix together the remaining ingredients. Sprinkle the herb mixture over all surfaces of the roast.
4. Roll the butterflied meat into an evenly shaped roast. Cut 6 pieces of butcher (cotton) twine and tie the rolled roast at 1 inch intervals.
5. Place the roast on the bottom rack of the pre-heated Memphis and insert the Intelligent Temperature Control Meat Probe. For a medium-rare roast set the meat probe temperature to 130 F.
6. When the roast reaches the desired temperature immediately wrap the roast in foil and allow it to rest for about 20 minutes (with the foil slightly open at the top). The temperature of the meat will rise during the resting period. Ours rose to 135 F (medium-rare). Slice, serve and enjoy!
Quick Ribs
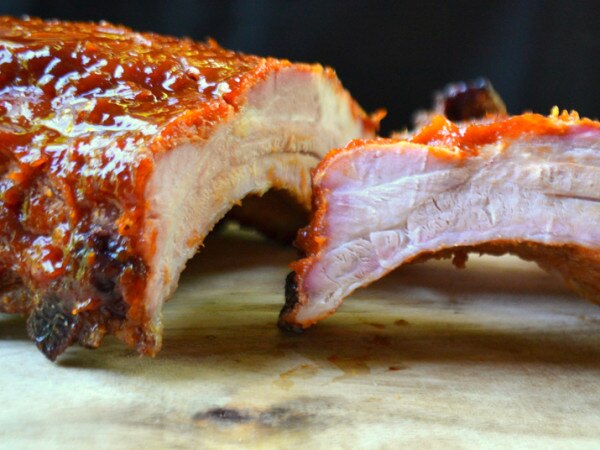
Prep Time: 15 mins
Yield: 4 (1/2 rack each)
Ingredients:
1 tbsp garlic powder
1 tbsp onion powder
1 tbsp brown sugar
1 tsp kosher salt
¼ tsp chili powder
¼ tsp chipotle powder
1/8 tsp cumin
1 tbsp Dijon mustard
2 full racks of baby back spare ribs
¼ C BBQ sauce
Preparation:
1. Mix together the garlic powder, onion powder, brown sugar, salt, chili powder, chipotle powder & cumin. Set aside.
2. Remove the paper thin membrane from the backside of the ribs. It can be a bit hard to initially separate the membrane from the back of the rib bones but once you get it going here's a trick that will help you pull the membrane off once you get it started. Use a small piece of paper towel or a clean cloth to grip the loosened edge of the membrane. This will keep your fingers from slipping and the membrane should come off in one piece easily.
3. Coat the ribs, front and back with the Dijon mustard and sprinkle the spice rub mixture over both sides of the rack.
4. Place on the bottom rack of the Memphis Pellet Grill and close the lid. Set the grill temperature to 200 degrees F and smoke the ribs for one hour.
5. Baste the ribs with half of the sauce and turn the grill heat up to 350 degrees F. Grill for ½ hour (lid down) then brush the remaining sauce on the ribs and continue grilling for another ½ hour.
6. The ribs are done when the internal temperature reaches 180 - 190 degrees F. It may be hard to gauge the temp using a thermometer so simply check the side of the ribs visually. When they are done the meat retreats from the edge of the ribs leaving about a quarter to a third of an inch of rib bone showing along the side of the rack. The rack should twist easily and if you insert a toothpick between the ribs it should slide in and out easily. This means the fats and collagens have melted leaving you with a tender and tasty rack. But don't expect the meat to be falling of the bone when you use this method. The end result will be a tender and lightly smoky flavored rack of ribs and it will be ready to eat in approximately 2 hours!
Low 'N' Slow Smoked Beef Brisket
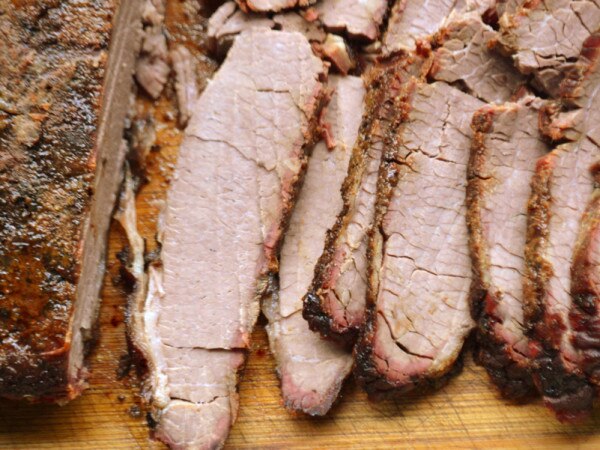
Cook Time: 3 hours
Ingredients:
12 lbs. beef brisket
2 Tbsp vegetable oil
4 oz. beef broth
4 oz. apple juice
4 oz. BBQ Sauce
1 Batch brisket rub (ingredients below)
3 Tbsp coarse black pepper
3 Tbsp kosher salt
1 Tbsp sugar
1 Tbsp onion powder
2 Tsp dry mustard
2 Tsp garlic powder
2 Tsp chili powder
2 Tsp chipotle powder
Preparation:
1. To make the Brisket Rub, combine the first seven ingredients in a small bowl and mix well. Store in an air-tight container until needed.
2. Rub oil into brisket.
3. Rub dry mix into brisket.
4. Let marinate for 24 hours.
5. Place brisket on lower rack of the Memphis pellet Grill, fat side up. Insert the meat probe into the brisket avoiding the blade bone. Set the meat probe temp to 150 degrees F and close the grill lid.
6. Set the Memphis Grill temp to 225 degrees F.
7. Smoke the meat until internal temperature reaches 150 degrees F.
8. Place brisket in 2-inch pan with 1/2 C beef broth and 1/2 C apple juice.
9. Cover the pan tightly with foil and place back on the grill.
10. Continue smoking until the internal temp reaches 190 degrees F.
11. Lower grill temp to 190 degrees F and let meat rest on grill for 3 hours.
12. Remove brisket from grill.
13. Carve and serve with BBQ sauce on the side.
Grilled Focaccia Bread
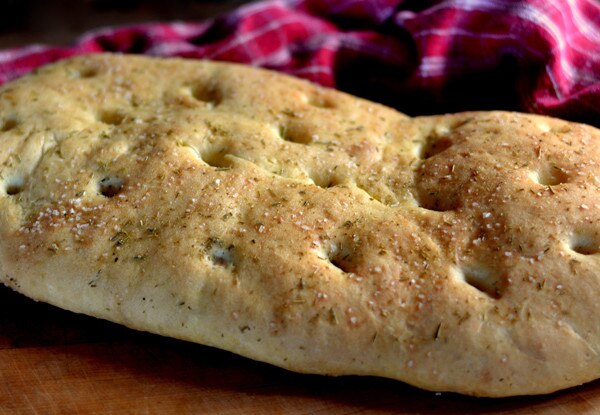
1 packet of yeast (2 ¼ tsp)
½ tsp sugar
1 C lukewarm water
2 C unbleached white flour
1 tsp Kosher salt
3 Tbs olive oil
3 tsp fresh rosemary leaves, minced (or 2 tsp dried)
Preparation:
1. Dissolve sugar in the warm water and sprinkle the yeast overtop. Set aside for five minutes or until the yeast is completely dissolved and frothy.
2. Add 1 C of flour, 2 Tbs of the olive oil, ½ tsp of the Kosher salt, 1 ½ Tbs of the minced rosemary (reserve the remaining olive oil, salt and rosemary for later use). Beat for 2 minutes using a hand mixer. * Please note if you use dried rosemary use a mortar & pestle to grind the rosemary "needles" into smaller & softer pieces. You can also use a clean coffee grinder for chopping and grinding spices and herbs.
3. Slowly add the remaining flour, a bit at a time while mixing by hand. When the dough starts to form into a ball turn it out onto a clean lightly floured surface. Knead the dough for 5 - 10 minutes until it becomes smooth and elastic. Continue to dust the counter with flour as needed during the kneading process, to keep the dough from sticking to the surface.
4. Lightly oil a bowl and place the dough inside, swirling it around so it becomes completely coated with oil. Place in a warm, draft-free spot, loosely covered with a clean towel. Let the dough rise for 45 minutes - 1 hour or until doubled in bulk.
5. Punch down the dough and divide into two equal sized pieces. Lightly flour your working surface again. Form one of the dough pieces into a round ball and flatten it slightly using the palm of your hand to form a disc shape. Roll the dough disc out into an oblong shape about 2 ½ inches thick, 6 inches wide and 12 inches long.
6. Carefully move the rolled out dough onto a parchment lined cookie sheet. Using your finger poke holes about every 3 inches across the surface of the dough. Use half of the remaining olive oil to brush across the surface of the dough. Sprinkle with ½ the remaining rosemary and Kosher salt flakes. Cover loosely with plastic wrap and set aside in warm place to double in bulk (about 45 minutes).
7. Repeat steps 5 & 6 with the second piece of dough.
8. Preheat the Memphis Pellet Grill to 375 F.
9. Place the cookie sheets on the middle rack of the pre-heated grill, close the lid and bake the focaccia for 25 minutes or until it is lightly browned and the crust sounds hollow when you give it a tap.
10. Cool on wire racks.
Chocolate Chip Cookies
Cook Time: 8-10 minutes
Ingredients:
2 1/4 Cup flour
1 tsp baking soda
1 tsp salt
3/4 Cup packed brown sugar
3/4 Cup white sugar
1/2 Cup butter
1/2 Cup shortening (butter flavored)
2 eggs
1 tsp vanilla
1-1 1/2 Cup chocolate chips
Preparation:
1. Preheat Memphis Wood Fire Grill to 350 degrees F.
2. Beat sugar, brown sugar, butter and shortening together.
3. Mix eggs into sugar mixture.
4. In a separate bowl, combine flour, baking soda, and salt, and mix them together.
5. Slowly add flour mixture to sugar mixture and blend together.
6. Fold in chocolate chips.
7. For each cookie, place one round spoon size of batter onto an ungreased cookie sheet.
8. Bake for 8-10 minutes or until golden brown.
9. Let the cookies rest for a couple minutes, then serve and enjoy!
Chicken Quarters Braised with Jalapeno, Lime and Garlic
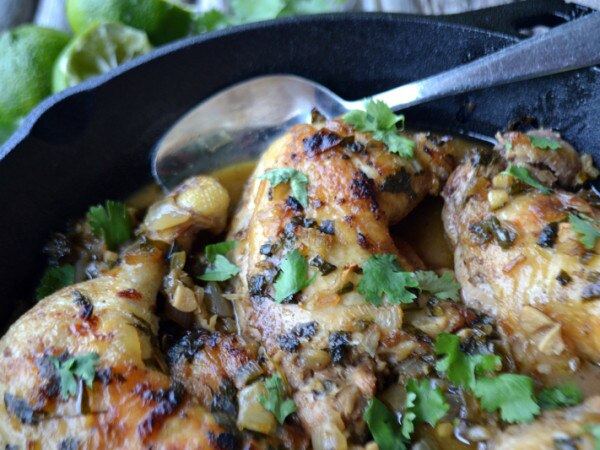
Cook Time: 45 minutes - 1 hour
Serves: 4 people
Ingredients:
4 chicken leg/thigh quarter sections
1 tsp kosher salt flakes
¼ tsp chipotle powder
½ tsp black pepper
2 T garlic powder
½ tsp freshly grated nutmeg
2 T oil
1 cooking onion, finely chopped
3 jalapeno peppers, seeded and finely chopped
6 garlic cloves, roughly chopped
½ C dry white wine
Juice of 2 limes
1 C chicken broth
½ C cilantro leaves, shredded
Preparation:
1. Preheat the Memphis Pellet grill to 375 degrees F. Place a heavy cast iron skillet in the grill.
2. Rinse the chicken pieces and pat dry. Mix together salt, chipotle powder, black pepper, garlic powder and nutmeg. Sprinkle both sides of each chicken piece with the spice rub mixture.
3. In a heavy cast iron skillet heat 1 T of the oil and brown the chicken pieces. Remove from skillet.
4. Add one more T of oil to the hot skillet and saute the onion until they soften and begin to turn a golden brown. Add chopped jalapenos and garlic while continuing to saute for 2 more minutes.
5. Next add the chicken broth and wine to the skillet bring to the boiling point then reduce to a simmer. Add the lime juice. Continue simmering for 4 more minutes. Place the chicken in the skillet, sprinkle the shredded cilantro leaves on top and place the skillet on the pre-heated grill. Close the lid and bake for 45 minutes (or until the meat probe reaches 165 degrees F).
6. Remove from the grill and let the chicken sit for 5 minutes before serving. Garnish with fresh cilantro.
Beer Can Turkey
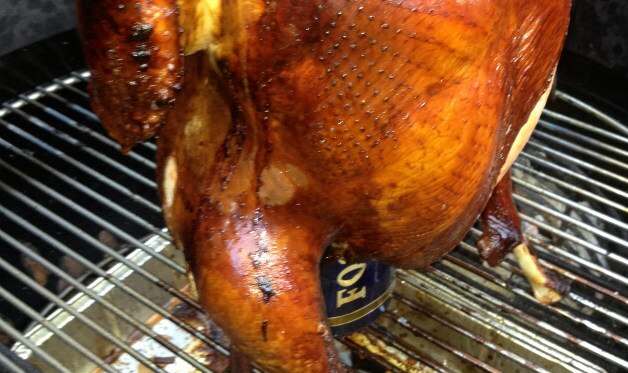
Cook Time: 3 hours
Advance Prep:
3 cups wood chips or chunks (preferably hickory), soaked for 1 hour in water or beer to cover, then drained.
Ingredients:
One 1-liter can Foster's Lager
One 8- to 10-pound turkey, thawed if previously frozen
For the Rub:
2 tablespoons poultry seasoning
4 teaspoons kosher salt
2 teaspoons freshly ground black pepper
1 teaspoon ground sage
1 teaspoon dried oregano
8 tablespoons (1 stick) salted butter, melted
Preparation:
1. Pop the tab off the beer can. Drink half the beer or pour it into the soaking water of the wood chips or chunks. Using a church key-style can opener, make 2 additional holes in the top of the beer can. Set the can of beer aside.
2. Combine the ingredients for the rub in a small bowl and stir to mix.
3. Remove the packet of giblets from the front and body cavities of the turkey and set aside for another use. Remove and discard the fat inside the body and neck cavities. Rinse the turkey, inside and out, under cold running water and then drain and blot dry, inside and out, with paper towels. Sprinkle 2 teaspoons of the rub inside the body cavity and 1 teaspoon rub in the neck cavity of the turkey. Brush the outside of the turkey with 2 tablespoons melted butter. Sprinkle the outside of the turkey with 1-1/2 tablespoons rub and rub it all over the skin. Stir 1 tablespoon rub into the remaining melted butter and set aside.
4. Set up the grill for indirect grilling following the instructions above.
5. Spoon any remaining rub through the holes in the top of the can into the beer. Don't worry if it foams up: This is normal. Holding the turkey upright, with the opening of the body cavity at the bottom, lower it onto the beer can so the can fits into the cavity. Pull the legs forward to form a sort of tripod, so the bird stands upright. (The rear leg of the tripod is the beer can.) Tuck the wing tips behind the turkey's back.
6. When ready to cook, toss half the wood chips on the coals. (If using a gas grill, place all the chips in the smoker box or in a foil smoker pouch and preheat on high until you see smoke, then reduce the heat to medium.) Stand the turkey upright in the center of the hot grate, over the drip pan, away from the heat. Pull the legs forward to give it stability.
7. Cover the grill and cook the turkey until the skin is a dark golden brown and very crisp and the meat is cooked through (165 degrees on an instant-read meat thermometer inserted in the thickest part of the thigh), 2 to 2-1/2 hours. If using a charcoal grill, you'll need to add 12 fresh coals and 3/4 cup wood chips per side after 1 hour. Baste the outside of the turkey with the butter-rub mixture every 30 minutes. (Steady the turkey with one hand, preferably protected with food-safe insulated gloves, at the top to keep it from tipping.) If the turkey skin starts to brown too much (and it will have a tendency to do so at the top), loosely tent the bird with foil.
8. Using sturdy tongs, carefully transfer the turkey in its upright position on the beer can to a platter. Let it rest for 15 minutes, then present it to your guests. (Grab the bird by the beer can just under the butt.) Let rest for 10 minutes, then carefully lift the bird off the beer can. Take care not to spill the hot beer or otherwise burn yourself. Carve the turkey and serve at once.
TIPS: Some turkeys come with a wire truss that holds the legs together: You'll need to remove this to beer can the turkey. Gently wiggle it free or cut it with wire cutters. Be sure to remove the bag of giblets in both the main and front cavities.
Fire-Roasted Apples
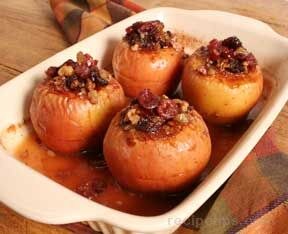
Cook Time: 40 minutes - 1 hour
Ingredients:
1Cup wood chips (preferably apple or maple), soaked 1 hour in apple cider or cold water to cover, then drained.
8 firm, sweet apples, such as Cortlands or Galas
6 tbsp unsalted butter (at room temperature)
1/4 cup firmly packed dark brown sugar
1/4 cup dried currants or raisins
1/4 cup graham cracker crumbs, toasted bread crumbs, or ground almonds
1/2 teaspoon ground cinnamon
1/4 teaspoon freshly grated nutmeg
1 teaspoon vanilla extract
4 marshmallows, cut in half (optional)
Preparation:
1. Lightly grease an aluminum-foil roasting pan. Core the apples, using an apple corer or melon baller, but don't cut all the way through the bottom; the idea is to create a cavity for stuffing.
2. Cream the butter and brown sugar in a medium-size bowl until light and fluffy. Beat in the currants, graham cracker crumbs, cinnamon, nutmeg, and vanilla. Spoon the brown sugar mixture into the apples, dividing it evenly among them. Place a marshmallow half (if using) on top of each apple. Place the apples in the prepared roasting pan.
3.Set up the grill for indirect grilling. No drip pan is necessary for this recipe.
If using a gas grill, place all of the wood chips in the smoker box and preheat the grill to high; when smoke appears, reduce the heat to medium.
If using a charcoal grill, preheat it to medium.
4. When ready to cook, if using a charcoal grill, toss all of the wood chips on the coals. Place the pan of apples in the center of the hot grate, away from the heat, and cover the grill. Cook the apples until soft, 40 minutes to 1 hour. Check the apples after 40 minutes and, if the marshmallows start to brown too much, cover the apples with a piece of aluminum foil. Serve the apples at once.
Double Whiskey-Smoked Turkey
Cook Time: 2 days
Serves: 8 - 10 people
Ingredients:
One 12 - 14 pound turkey
For the brine:
4 bay leaves
1 medium onion, quartered
4 cloves
1 1/2 cups kosher salt or sea salt
1/2 cup maple syrup
2 quarts hot water plus 6 quarts cold water (2 gallons in all)
1 cup of your favourite whiskey
1 tablespoon black peppercorns
4 tablespoons salted butter, melted
Preparation:
1. Thaw the turkey if frozen. Remove the neck and giblets (liver, gizzard, heart) and set aside for another use. (Be sure to empty both the front and main cavities.) Rinse the turkey with cold running water inside and out. Fold the wing tips under the body.
2. Make the brine: Pin the bay leaves to the onion quarters with cloves. Place the salt and maple syrup in a very large stockpot or other large food-safe container. Add the hot water and whisk until the salt is dissolved. Whisk in the cold water, whiskey, and peppercorns. Let the brine cool completely. Add the turkey, leg end up, and the onion quarters. Jiggle the turkey as needed so the brine flows into the cavity and the whole bird is submerged. Cover with plastic wrap and brine the turkey in the refrigerator for 24 hours. Invert the turkey half way through so it brines evenly.
3. The next day, light your smoker according to the manufacturer’s instructions and preheat to 250 degrees. Add the wood as specified by the manufacturer.
4. Smoke the turkey until the skin is browned and the internal temperature in the thigh reaches 145 degrees. This will take 4 to 5 hours. After 3 hours, start basting the turkey all over with melted butter and baste again every hour.
5. Increase the heat in your smoker to 400 degrees, if possible. (Some smokers don’t go that high.)
6. Otherwise, set up a grill for indirect grilling and preheat to medium-high (400 degrees). Transfer the turkey to the grill (over the drip pan).
7. Baste the bird with melted butter and continue roasting until the skin is browned and crisp and the internal temperature in the thigh reaches 165 degrees, 45 minutes to an hour. Baste once or twice with the butter.
8. Transfer the turkey to a platter and drape a sheet of foil over it. (Don’t bunch the foil around the bird or the steam will make the skin soggy.) Let rest for 20 minutes, then carve.
Candy Smoked Salmon
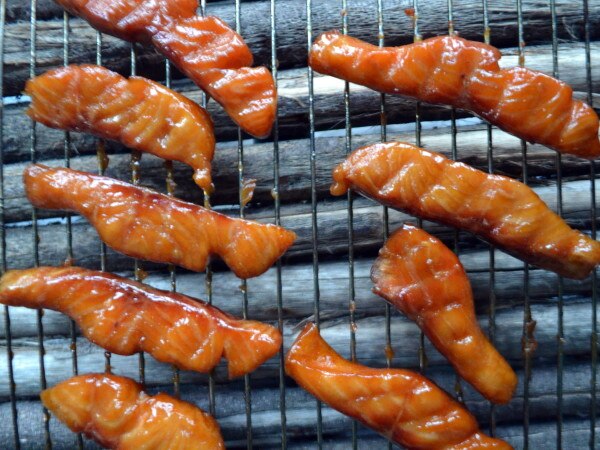
Cook Time: 3 hours
Ingredients:
1 lb. Salmon Fillet (skin on)
1 cup Dark Brown Sugar
1 cup Kosher Salt Flakes
1/2 cup Maple Syrup
1 tsp Red Pepper Flakes (more or less depending if you want heat or not!)
Preparation:
1. Slice salmon horizontally into ½" thick slices.
2. Mix sugar and kosher salt together.
3. Cover the bottom of a flat bowl large enough to hold half of the slices in a single row, with a thin layer of the sugar & salt mixture. Place a single layer of salmon strips on top of the salt/sugar mixture.
4. Add another layer using the rest of the salmon strips and then completely cover the salmon with the remaining sugar/salt mixture. The idea here is to completely bury the salmon in the salt and sugar.
5. Cover and refrigerate for at least 30 minutes but no longer 3 hours tops. The salmon will become too salty if it remains in the mixture for too long. I left mine for 1 hour and the end result was salty enough to preserve the salmon but not so much that the salty flavor overwhelmed.
6. Rinse each strip of salmon quickly under cold water and pat dry.
7. Arrange salmon strips on a wire rack and refrigerate uncovered for at least 4 hours or overnight. This allows the surface of the salmon strips to dry out and form a pellicle. The pellicle is a slightly hardened surface that will allow the smoke to adhere to the salmon strip once the smoking process begins.
8. Mix the maple syrup and pepper flakes together, brush onto all sides of the salmon strips and lay the strips out on the grill.
9. Close the lid and set the Intelligent Temperature Control (ITC) to 180 degrees F. Leave for one hour.
10. Baste the salmon strips with the syrup, close the lid and turn the temperature up to 200 degrees F and continue to smoke the salmon for another hour.
11. Baste the strips one last time and continue to smoke for 1 – 2 more hours. The longer smoking time will yield a drier salmon jerky.
Slow Smoked Pulled Pork
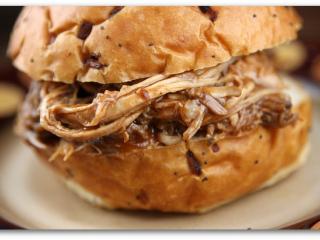
Cook time: 10 hours
Ingredients:
1 pork shoulder
Montreal Steak Seasoning
Salt and pepper
Favourite Barbecue Sauce
Preparation:
1. Preheat Memphis Wood Fire Grill to 240 degrees F. Check to see there are enough pellets for an 8-10 hour burn.
2. Rinse pork shoulder with cold water. Trim loose fat but do not remove the “fat cap."
3. Liberally apply Montreal Steak Seasoning, as much as will possibly stick.
4. Immediately place on the grill with the fat cap up.
5. Smoke at 240 degrees F until you reach an internal temperature of 160 degrees F.
6. Remove from grill.
7. Tightly wrap pork shoulder in heavy duty aluminum foil.
8. Place pork shoulder back on the grill.
9. Slow smoke at 240 degrees F until pork reaches an internal temperature of 195 degrees F, approximately 8-10 hours.
10. When pork reaches 195 degrees F internal temperature, remove from heat and let it rest and absorb some of the juices.
11. Unwrap, shred and enjoy mouth watering shredded pork. Add Memphis Smokehouse BBQ Sauces or other barbecue sauces to taste.
BBQ Chicken Pizza
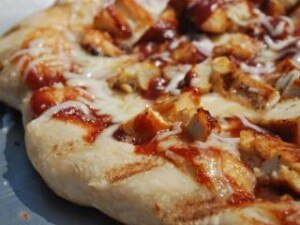
Cook time: 10 min
Prep time: 20 min
Ingredients:
1 ½ C. cubed chicken
1 C. sauce (mix ½ C of red tomato sauce and ½ C BBQ sauce)
1/3 C. red onion
1 C. mushrooms
1 ½ C. mozzarella cheese
1 ball of pizza dough
2-3 tbsp cornmeal
Preparation:
1. Preheat grill to 500 degrees F.
2. Grill and cube 1 1/2 C chicken.
3. Sprinkle 3 Tbsp of cornmeal on pizza stone.
4. Roll pizza dough ball on pizza stone over cornmeal.
5. Spread sauce evenly over dough.
6. Dice 1/3 C red onion.
7. Sauté 1 C mushrooms.
8. Sprinkle chicken evenly over rolled pizza dough.
9. Apply remaining ingredients on pizza dough.
10. Grill pizza at 500 degrees F for 10 minutes or until edge of crust is golden brown.
11. Slice, dish up and devour!
Pizza Stone available here: Camp Chef Pizza Stone
Award-Winning Ribs!
Cook time: 5 hours
Ingredients:
4 oz. salt
4 oz. brown sugar
2 oz. mild chili powder
1/2 oz. granulated onion
1/2 oz. granulated garlic
1/2 oz. coarse black pepper
1/2 oz. ground cumin
1/2 oz. ground coriander
1 tsp chipotle powder
Preparation:
1. Mix all rub ingredients together and store until needed.
2. Evenly distribute rub over both sides of the ribs. Rub into the meat and refrigerate overnight.
3. Heat Memphis to 200 degrees F.
4. Place a shallow foil pan on the grill and add apple juice.
5. Place ribs in the center of the grill and cook for 5 hours.
6. Brush both sides of the ribs with 1 oz of sauce, repeating every 15 minutes until the 5 hours are up. Note: If you want dry ribs, skip this step.
7. Close the lid and cook for another hour.
8. Cut ribs and serve!
Call us with any questions or for a
free consultation 1-888-444-8497